Embroidery has long been a cornerstone of the fashion and garment accessory industry, especially in custom patches, logos, and decorative trims. While modern embroidery machines can produce thousands of designs with ease, the real art lies in choosing the right stitch type.
Among the countless embroidery stitches available, three remain the foundation of professional embroidery design — Running Stitch, Satin Stitch, and Tatami Stitch. Each technique has its own unique texture, appearance, and ideal use case. Understanding how these stitches differ will help you create the perfect look for your brand, garment, or patch.
In this article, we’ll break down each stitch in detail, share key technical parameters, and offer expert insights into how to choose the most suitable embroidery method for your design.
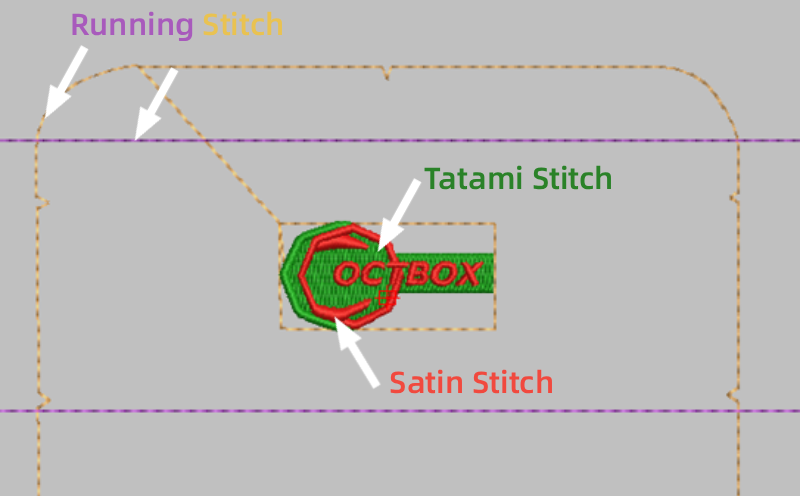
1️⃣ Running Stitch — The Foundation of Every Design
What is a Running Stitch?
The Running Stitch (also called the Straight Stitch) is the simplest and most versatile embroidery technique. It uses a single continuous line of stitches to form outlines or fine details.
This stitch is often used for borders, outlines, small text, and delicate patterns. Because it requires fewer stitches and less time, it’s one of the most cost-efficient techniques in embroidery manufacturing.
Key Features
- Creates clear, crisp lines.
- Works well for small fonts, outlines, and fine details.
- Fast stitching speed and low thread consumption.
- Ideal for text smaller than 1 cm.
Recommended Technical Parameters
- Minimum letter height: 3.2 mm (to keep characters legible)
- Stitch length: around 0.6 mm
- Thread tension: medium-tight to prevent loose lines
Pros and Cons
| Advantages | Limitations |
|---|---|
| Clean, minimal look | Not suitable for large filled areas |
| Fast and efficient | Lacks texture and gloss |
| Works for thin outlines | Limited visual depth |
Best for: small text, contour lines, subtle outlines, or minimalist logos.
2️⃣ Satin Stitch — Smooth, Glossy, and Dimensional
What is a Satin Stitch?
The Satin Stitch (also known as Zigzag Stitch or Column Stitch) is the go-to choice for creating bold, shiny, and smooth surfaces. It involves tightly packed zigzag stitches laid side by side, forming a bright satin-like sheen.
This technique is perfect for letters, logo borders, and decorative details that require a high-end look.
Key Features
- Smooth, glossy texture with strong 3D appearance.
- Perfect for small and medium-sized design areas.
- Highly durable and visually rich.
Recommended Technical Parameters
- Stitch density: 0.3 – 0.4 mm between needle penetrations.
- Minimum line width: 1.0 mm (anything thinner may collapse).
- Recommended area width: 3 – 10 mm.
Pros and Cons
| Advantages | Limitations |
|---|---|
| Smooth, premium texture | Prone to puckering on large areas |
| Strong gloss and dimensional look | Higher stitch count and production time |
| Works well on curved letters or borders | Can distort on stretchy fabrics |
Best for: logos, small text, high-gloss decorative details, or any patch that needs a luxurious finish.
3️⃣ Tatami Stitch — Perfect for Large Fills and Bold Backgrounds
What is a Tatami Stitch?
Also called the Fill Stitch, the Tatami Stitch uses rows of closely spaced running stitches laid at specific angles to cover large areas evenly. It’s often used for backgrounds, large logos, or solid color blocks on embroidered patches.
Key Features
- Provides full, even coverage over large areas.
- Texture can be customized by adjusting angle and density.
- Stable and resistant to wrinkling.
Recommended Technical Parameters
- Stitch length: 0.4 – 0.6 mm.
- Filling angle: typically alternates between 45° and 135° to create natural shading.
- Thread tension: medium, for balanced coverage.
Pros and Cons
| Advantages | Limitations |
|---|---|
| Uniform fill, strong structure | High stitch count and longer production time |
| Great for bold shapes and logos | Not ideal for very small details |
| Can create texture variations | May appear flat if overused |
Best for: background areas, bold text, or large patch logos that require even texture and solid coverage.
4️⃣ Recommended Embroidery Parameters for Patches
| Parameter | Suggested Setting | Purpose |
|---|---|---|
| Minimum text height | ≥ 3.2 mm | Keeps letters readable and crisp |
| Running stitch length | 0.6 mm | Ensures line clarity |
| Satin stitch density | 0.3 – 0.4 mm | Smooth, glossy surface |
| Tatami stitch length | 0.4 – 0.6 mm | Balanced coverage and durability |
| Thread type | Polyester / Rayon | Excellent gloss and wash resistance |
| Base fabric | Twill, felt, or canvas | Chosen based on end use |
| Thread tension | Medium-tight | Prevents puckering or loose threads |
5️⃣ How to Choose the Right Stitch for Your Design
Selecting the right embroidery stitch depends on the design’s scale, texture, and purpose. Here’s how professionals make that decision:
- For small text or fine outlines:
→ Use Running Stitch for clarity and speed. - For premium, detailed logos:
→ Use Satin Stitch to enhance gloss and create 3D dimension. - For large backgrounds or bold logos:
→ Choose Tatami Stitch for consistent coverage and texture. - For balanced designs:
→ Combine stitches strategically — outline with Satin, fill with Tatami. - Avoid stitch conflict:
→ Always separate areas by stitch type during digitizing to maintain consistent density. - Prototype first:
→ Run a sample test before bulk production to ensure thread behavior and density suit the chosen fabric.
6️⃣ Expert Tips for Embroidery Designers
- Adjust density by fabric type. Stretchy materials like spandex require looser density than stiff fabrics.
- Mind the scale. Very small designs demand precision; consider simplifying complex details.
- Test under lighting. Satin stitches catch more light, while Tatami stitches appear matte — use this to your advantage.
- Optimize for speed and cost. Fewer stitches mean faster production and lower costs.
- Use matching bobbin thread. This reduces visible contrast on thin fabrics.
7️⃣ Final Thoughts — Balance Aesthetics, Efficiency, and Function
Each embroidery stitch offers its own visual and technical benefits.
- Running Stitch gives you precision and speed.
- Satin Stitch delivers elegance and depth.
- Tatami Stitch ensures stability and boldness.
For custom patches, uniform badges, or fashion embellishments, the best approach is often a combination — outlines in Satin, fills in Tatami, and fine details in Running Stitch.
Understanding how each stitch interacts with your material, design scale, and production process will not only improve the quality of your embroidery but also enhance brand perception and cost efficiency.
By mastering these three foundational stitches, you’ll be well-equipped to create embroidery designs that are not only beautiful but also technically sound and production-ready.
About Author
——————————————————————————————————————————————

Alexander
Online Sales Manager
Alexander specialize in digital marketing and understanding customer psychology, providing clients with the right solutions through data insights and creative strategies.
——————————————————————————————————————————————